JSF 2.2: HTML 5 Support
No doubt HTML 5 is the hottest topic in web development in these years.Besides a series of new tags are added, the form element support is also improved. The type attribute of input element can be text, email, number, range, url, date etc. Ideally, a browser could provide native validation for these input tags.(but this feature support is very different between browsers).
JSF 2.0
In JSF 2.0, some attributes of HTML 5 form elements can not be rendered correctly in the standard JSF input components. For example, <input type="email" can not be rendered by <h:inputText type="email".omnifaces fixes the issue, and adds basic HTML5 form elements support by a extened Html5RenderKitFactory.
What you need to do is declare a Html5RenderKitFactory in the faces-config.xml.
<factory>
    <render-kit-factory>org.omnifaces.renderkit.Html5RenderKitFactory</render-kit-factory>
</factory>
Now, the <h:inputText type="email" can be rendered as expected. But unfortunately, the omnifaces solution does not support custom data- attributes in the HTML 5 form input tags.
HTML5 support in JSF 2.2
In Java EE 7, HTML 5 is the first class citizen. But refactoring all JSF components to add extra input attributes is not a smart decision. JSF 2.2 provided a compromise solution to support HTML 5 input tags.- Through a new namespace(http://xmlns.jcp.org/jsf/passthrough), you can add extra HTML 5 attributes freely to existed JSF input components.
- Alternatively, you can use plain HTML input tags and attributes, and add JSF specific attributes via a new namespace(http://xmlns.jcp.org/jsf).
Passthrough Attributes
JSF 2.2 provides a new facelets taglib namespace to process Passthrough Attributes.xmlns:p="http://xmlns.jcp.org/jsf/passthrough"For example, you want to add placeholder to input element, just added a p:placeholder attribute.
<h:inputText p:placeholder="Type text here..."/>This tell JSF HTMLRenderKit keep back the attribute placeholder directly, not like JSF 2.0, any none support attributes will be ate by HTML RenderKit.
The core taglib also added a new tag to support passthrough feature.
<f:passThroughAttribute name="placeholder" value="Type text here..."/>This is equivalent to the above version.
You can add more than one attributes at the same time.
<h:inputText id="number" p:type="number" p:min="1" p:max="10" value="..."/>Or use multi f:passThroughAttribute nested in the inputText component.
<h:inputText id="text" value="#{html5Bean.text}" required="true">
    <f:passThroughAttribute name="placeholder" value="Type text here..."/>
    <f:passThroughAttribute name="required" value="true"/>
</h:inputText>
Or use a f:passThroughAttributes nested in the inputText component, it can accept a Map.<f:passThroughAttributes value="#{html5Bean.attrs}"/>
In backend bean, a Map is declared.private Map<String, String> attrs = new HashMap<String, String>();
@PostConstruct
public void init() {
log.info(" call init@");
this.attrs.put("type", "range");
this.attrs.put("min", "1");
this.attrs.put("max", "10");
this.attrs.put("step", "2");
}
You can also use a EL 3.0 Map expression as value. EL 3.0 is
extracted from JSF specifcation as a standalone specification now, we
will discuss it in further post.<f:passThroughAttributes value="#{{'type':'range', 'min':'0', 'max':'10', 'step':'2'}}"/>
A complete example of Passthrough Attributes.<h:form>
<h:messages showDetail="false" showSummary="true"/>
Text: <h:inputText id="text" value="#{html5Bean.text}" required="true">
<f:passThroughAttribute name="placeholder" value="Type text here..."/>
<f:passThroughAttribute name="required" value="true"/>
</h:inputText>
<br/>
Url: <h:inputText id="url" value="#{html5Bean.url}">
<f:passThroughAttribute name="type" value="url"/>
</h:inputText><br/>
Email: <h:inputText id="email" p:type="email" value="#{html5Bean.email}" /><br/>
Number: <h:inputText id="number" p:type="number" p:min="1" p:max="10" value="#{html5Bean.number}" >
<f:convertNumber minFractionDigits="0"/>
</h:inputText> <br/>
Range: <h:inputText id="range" value="#{html5Bean.range}">
<!-- f:passThroughAttributes value="#{html5Bean.attrs}"/ -->
<f:passThroughAttributes value="#{{'type':'range', 'min':'0', 'max':'10', 'step':'2'}}"/>
<f:convertNumber minFractionDigits="0"/>
</h:inputText><br/>
Date: <h:inputText id="date" p:type="date" value="#{html5Bean.date}" >
<f:convertDateTime pattern="yyyy-MM-dd"/>
</h:inputText><br/>
<h:commandButton value="Save" action="#{html5Bean.submit()}">
<f:ajax execute="@form" render="@all"/>
</h:commandButton>
</h:form>
<h:panelGroup id="out">
Text: <h:outputText value="#{html5Bean.text}"/><br/>
Url: <h:outputText value="#{html5Bean.url}"/><br/>
Email: <h:outputText value="#{html5Bean.email}"/><br/>
Number: <h:outputText value="#{html5Bean.number}"/><br/>
Range: <h:outputText value="#{html5Bean.range}"/><br/>
Date: <h:outputText value="#{html5Bean.date}"/><br/>
</h:panelGroup>
Through the passthrough feature in JSF 2.2, you can add any custom attribute to input element, such as the data-XXX attribute in Bootstrap framework. The Passthrough Attributes way is very friendly when you migrate the existed JSF application to JSF 2.2 and make it compatible with HTML 5.
Passthrough Elements
JSF 2.2 provides another facelets taglib namespace to support Passthrough Elements feature.xmlns:jsf="http://xmlns.jcp.org/jsf"All plain HTML element will be treated as equivalent facelets components.
For example.
<input jsf:id="text" type="text" jsf:value="#{html5Bean.text}" required="required" placeholder="Type text here..."/>
is equivalent to the <h:inputText. All standard attributes of h:inputText in the input tag can be treated automatically. The extra placeholder attributes will be keep as it is after it is rendered. You can find the complete comparison table between plain HTML tags and facelets components from Oracle Java EE tutorial.
As described in the Java EE tutorial, you have to mark at least one of the attributes with jsf prefix as a maker to make the input tag to be processed as a JSF component.
NOTE: In the above example, I found I have to add "jsf:" to the value attribute to make it work, or it will throw an exception at runtime, even I added a jsf:id in the the input tag already.
It is simple and stupid, and it is very friendly when you work together with a web designer.
An complete example to demonstrate Passthrough Elements feature.
<h:form prependId="false">
    <h:messages showDetail="false" showSummary="true"/>
    Text: <input jsf:id="text" type="text" jsf:value="#{html5Bean.text}" required="required" placeholder="Type text here..."/>
    <br/>
    Url: <input jsf:id="url" type="url"  jsf:value="#{html5Bean.url}"/><br/>

    Email: <input type="email" jsf:id="email" jsf:value="#{html5Bean.email}" /><br/>
    Number: <input jsf:id="number" type="number" min="1" max="10"  jsf:value="#{html5Bean.number}" >
        <f:convertNumber minFractionDigits="0"/>
    </input> <br/>
    Range: <input jsf:id="range"  type="range" min="1" max="10"  jsf:value="#{html5Bean.range}">
        <f:convertNumber minFractionDigits="0"/>
    </input><br/>

    Date: <input jsf:id="date" type="date" jsf:value="#{html5Bean.date}" >
        <f:convertDateTime pattern="yyyy-MM-dd"/>
    </input><br/>
    <input type="submit" jsf:id="submit" value="Save" jsf:action="#{html5Bean.submit()}">
    </input>
</h:form>
NOTE: In fact, this is really not a new feature. In the old
facelets(before JSF 2.0), it supports a jsfcid attribute in plain HTML
tags to identify a JSF component. What make me excited is it becomes
standard now.The pain of HTML 5 support in browsers
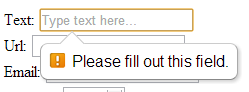
Currently only Opera supports all HTML 5 elements in this post.The following is the result of HTML 5 required attribute validation.
This is the the whole form displayed in Opera.
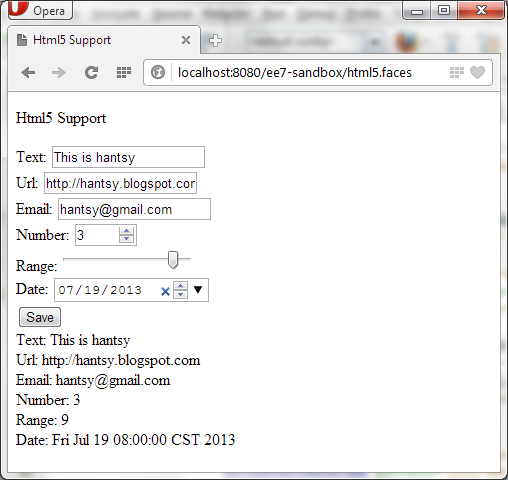
In Firefox, the range, number, date are not rendered as expected, they are displayed as plain text input instead.
HTML 5 looks beautiful, but the browser support is a little disappointed now.
NOTE: If f:ajax is added in the *h:commandButton and the form is submit in ajax way, I found the browser native validation does not work.*
Sample codes
Check out the complete codes from my Github.com, and play it yourself.https://github.com/hantsy/ee7-sandbox
评论