Create a restful application with AngularJS and Zend 2 framework
This example application uses AngularJS/Bootstrap as frontend and Zend2 Framework as REST API producer.
The backend code
This backend code reuses the database scheme and codes of the official Zend Tutorial, and REST API support is also from the Zend community.
Zend2 provides a
AbstractRestfulController for RESR API producing.class AlbumController extends AbstractRestfulController {
public function getList() {
$results = $this->getAlbumTable()->fetchAll();
$data = array();
foreach ($results as $result) {
$data[] = $result;
}
return new JsonModel(array(
'data' => $data)
);
}
public function get($id) {
$album = $this->getAlbumTable()->getAlbum($id);
return new JsonModel(array("data" => $album));
}
public function create($data) {
$data['id']=0;
$form = new AlbumForm();
$album = new Album();
$form->setInputFilter($album->getInputFilter());
$form->setData($data);
$id=0;
if ($form->isValid()) {
$album->exchangeArray($form->getData());
$id = $this->getAlbumTable()->saveAlbum($album);
}else {
print_r( $form->getMessages());
}
return new JsonModel(array(
'data' => $id,
));
}
public function update($id, $data) {
$data['id'] = $id;
$album = $this->getAlbumTable()->getAlbum($id);
$form = new AlbumForm();
$form->bind($album);
$form->setInputFilter($album->getInputFilter());
$form->setData($data);
if ($form->isValid()) {
$id = $this->getAlbumTable()->saveAlbum($form->getData());
}
return new JsonModel(array(
'data' => $id,
));
}
public function delete($id) {
$this->getAlbumTable()->deleteAlbum($id);
return new JsonModel(array(
'data' => 'deleted',
));
}
protected $albumTable;
public function getAlbumTable() {
if (!$this->albumTable) {
$sm = $this->getServiceLocator();
$this->albumTable = $sm->get('Album\Model\AlbumTable');
}
return $this->albumTable;
}
}
The naming convention of the methods for REST API is listed in the following table.
| URL | HTTP Method | Controller Method | Description |
| /albums | GET | getList | Get the list of Albums |
| /albums | POST | create | Create a new Album |
| /albums/:id | GET | get | Get the details of a Album |
| /albums/:id | PUT | udpate | Update a Album by id |
| /albums/:id | DELETE | delete | Delete a Album by id |
Besides the naming convention, you have to set the routing rule to make it work.
Change the content of module/Album/config/module.config.php to the following.
<?php

return array(
    'controllers' => array(
        'invokables' => array(
            'Album\Controller\Album' => 'Album\Controller\AlbumController',
        ),
    ),
    // The following section is new and should be added to your file
    'router' => array(
        'routes' => array(
            'album' => array(
                'type' => 'segment',
                'options' => array(
                    'route' => '/albums[/:id]',
                    'constraints' => array(
                        'id' => '[0-9]+',
                    ),
                    'defaults' => array(
                        'controller' => 'Album\Controller\Album'
                    ),
                ),
            ),
        ),
    ),
    'view_manager' => array(
        'strategies' => array(
            'ViewJsonStrategy',
        ),
    ),
);
For producing REST API, it needs render a JSON view instead of the HTML view.
The frontend AngluarJS pages
I do not want to duplicate the codes in this post, please checkout the codes github.com.
Run the application
Clone the source from github.com.
git clone https://github.com/hantsy/angularjs-zf2-sample
Run
php composer.phar install to install the depencies automaticially. This applicalication also used Composer to manage the dependencies.
Create a vhost setting in Apache for this application, set the value of the DocumentRoot is <your application path>/public.
<VirtualHost *:80>
    ServerName zf2-tutorial.localhost
    DocumentRoot E:/MyWorks/hantsy-labs/angularjs-zf2-sample/public

    SetEnv APPLICATION_ENV "development"
    <Directory E:/MyWorks/hantsy-labs/angularjs-zf2-sample/public>
        DirectoryIndex index.php
        AllowOverride All
        Order allow,deny
        Allow from all
    </Directory>
</VirtualHost>
Change the database setting(username and password) in theconfig/autoload/local.php.
return array(
     'db' => array(
         'username' => 'root',
         'password' => '',
     ),
 );
Start apache server.
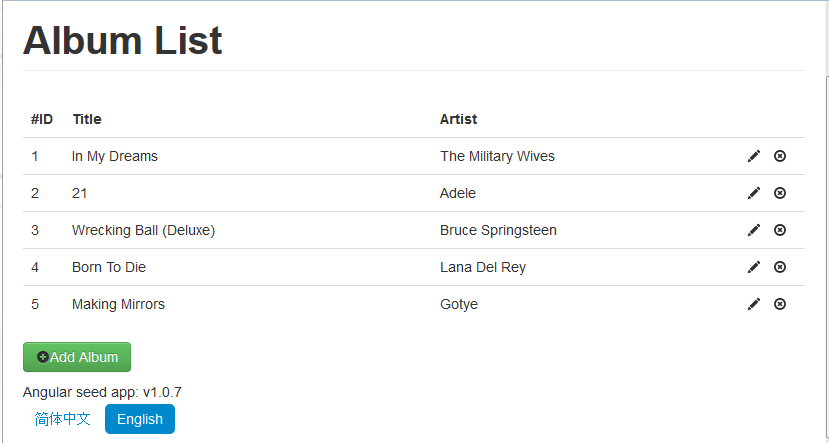
Open browser, navigate to http://zf2-tutorial.localhost/app/index.html#/albums.
Sample codes
Clone the sources from my github.com.
git clone https://github.com/hantsy/angularjs-zf2-sample
And switch to
stage1 branch.git checkout stage1
评论