跳至主要内容

Getting started with Angular 1.5 and ES6: part 6

I18n with Angular Translate

Your application could be required to support multi-languages. There are a few solutions to support i18n in Angular applications.
Angular translate is one of the most populars.
Install angular translate packages.
npm install --save angular-translate angular-translate-storage-cookie angular-translate-storage-local
Next import these files in app.js:
//...
import 'angular-translate';
import 'angular-translate-storage-cookie';
import 'angular-translate-storage-local';
//...
And register angular-translate module.
const requires = [
  'pascalprecht.translate',
 //...
Configure $translateProvider in app.config.js file.
import en from './i18n.en.json';
import zh from './i18n.zh.json';

function AppConfig(/.../, $translateProvider){
//...
  // Adding a translation table for the English language
  $translateProvider.translations('en', en);
  // Adding a translation table for the Chinese language
  $translateProvider.translations('zh', zh);
  // Tell the module what language to use by default
  $translateProvider.preferredLanguage('en');
  // Tell the module to store the language in the local storage
  $translateProvider.useLocalStorage();
}
We use webpack json-loader to load json file.
Install json-loader.
npm install --save json-loader
And configure it in webpack.config.js for loading json file.
{ test: /\.json$/, loader: 'json' },
Add two json files in the app folder.
i18n.en.json:
{
  "posts": "Posts",
  "new-post": "New Post"
}
i18n.zh.json:
{
  "posts": "博文",
  "new-post": "新建博文"
}
Open the navbar template file, replace the text of nav links with:
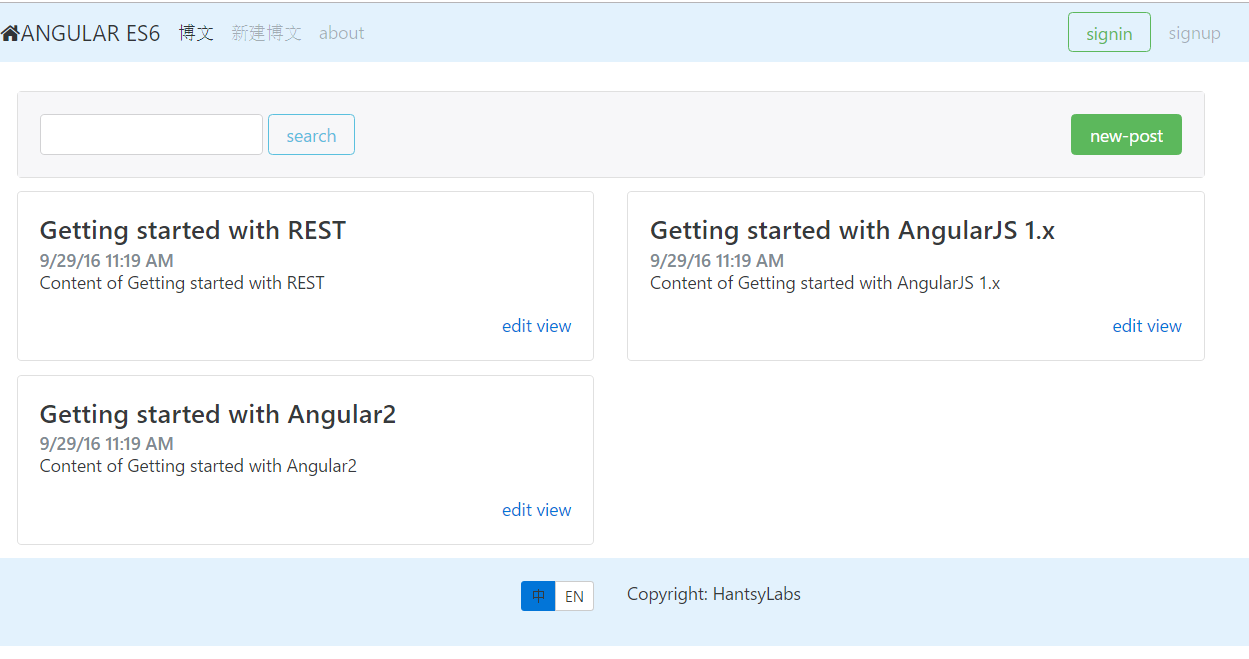
<li class="nav-item" ui-sref-active="active"><a class="nav-link" href="#" ui-sref="app.posts">{{'posts'|translate}}</a></li>
<li class="nav-item" ui-sref-active="active"><a class="nav-link" href="#" ui-sref="app.new-post">{{'new-post'|translate}}</a></li>
<li class="nav-item" ui-sref-active="active"><a class="nav-link" href="#" ui-sref="app.about">{{'about'|translate}}</a></li>
Angular-translate provides a translate filter to translate the text in links.
Now run the application via executing gulp serve in the project root folder.
i18n-1
As you see the posts, new-post in the navbar are replaced with the texts in our i18n.json for English language. But we have not set about there, it displays the original text, and does not indicate what we had omitted.
There are some approaches to notify developers.
Install angular-translate-handler-log which is an extension of angular-translate.
npm install --save angular-translate-handler-log
Import it in app.js file:
import 'angular-translate-handler-log';
Set it in app.config.js file.
$translateProvider.useMissingTranslationHandlerLog();
When the application is reloaded in Chrome browser, an warning messages will be displayed in the Chrome console.
i18n-2
And you can also handle the exception when the item to be translated is not found.
Define an angular factory.
.factory('customTranslationHandler', function () {
    return function (translationID) {
        // return the following text as a translation 'result' - this will be
        // displayed instead of the language key.
        return '[' + translationID + ']';
    };
})
Use this factory to handle missing translations instead of the former useMissingTranslationHandlerLog.
 $translateProvider.useMissingTranslationHandler('customTranslationHandler');
angular-translate provides a $translate service to change language and set language.
In footer.controller.js, add methods:
setLanguage(key) {
this._$translate.use(key);
}

isLanguage(key) {
return key===this._$translate.use();
} 
In the footer template file, add two buttons in a button group to change languages between Chinese and English.
<div class="btn-group btn-group-sm" role="group">
  <a class="btn" ng-class="($ctrl.isLanguage('zh')) ? 'btn-primary' : 'btn-secondary'" ng-click="$ctrl.setLanguage('zh')">中</a>
  <a class="btn" ng-class="($ctrl.isLanguage('en')) ? 'btn-primary' : 'btn-secondary'" ng-click="$ctrl.setLanguage('en')">EN</a>
</div>
Run this application again.
i18n-3
More about $translate, check official Angular translate docs .
Angular translate support variables in translation text.
For example, translate the welcome info for signin page.
 "welcome-back":"Welcome back,{{name}}"
And use it and replace the placeholder signature with real string you expected here.
this._toastr.success(this._$translate.instant('welcome-back', {
  name: this.data.username
}));
If you want to use advanced pluralization provided by MessageFormat.js.
Just install angular-translate-interpolation-messageformat which bridges angular translate with messageformat:
npm install --save  angular-translate-interpolation-messageformat
Declare we will use it in app.config.js:
$translateProvider.useMessageFormatInterpolation(); 
Now you can use more advanced expression in messages, check Angular translate pluralization docs.

评论

此博客中的热门博文

AngularJS CakePHP Sample codes

Introduction This sample is a Blog application which has the same features with the official CakePHP Blog tutorial, the difference is AngularJS was used as frontend solution, and CakePHP was only use for building backend RESR API. Technologies AngularJS   is a popular JS framework in these days, brought by Google. In this example application, AngularJS and Bootstrap are used to implement the frontend pages. CakePHP   is one of the most popular PHP frameworks in the world. CakePHP is used as the backend REST API producer. MySQL   is used as the database in this sample application. A PHP runtime environment is also required, I was using   WAMP   under Windows system. Post links I assume you have some experience of PHP and CakePHP before, and know well about Apache server. Else you could read the official PHP introduction( php.net ) and browse the official CakePHP Blog tutorial to have basic knowledge about CakePHP. In these posts, I tried to follow the steps describ

JPA 2.1: Attribute Converter

JPA 2.1: Attribute Converter If you are using Hibernate, and want a customized type is supported in your Entity class, you could have to write a custom Hibernate Type. JPA 2.1 brings a new feature named attribute converter, which can help you convert your custom class type to JPA supported type. Create an Entity Reuse the   Post   entity class as example. @Entity @Table(name="POSTS") public class Post implements Serializable { private static final long serialVersionUID = 1L; @Id @GeneratedValue(strategy = GenerationType.AUTO) @Column(name="ID") private Long id; @Column(name="TITLE") private String title; @Column(name="BODY") private String body; @Temporal(javax.persistence.TemporalType.DATE) @Column(name="CREATED") private Date created; @Column(name="TAGS") private List<String> tags=new ArrayList<>(); } Create an attribute convert

Auditing with Hibernate Envers

Auditing with Hibernate Envers The approaches provided in JPA lifecyle hook and Spring Data auditing only track the creation and last modification info of an Entity, but all the modification history are not tracked. Hibernate Envers fills the blank table. Since Hibernate 3.5, Envers is part of Hibernate core project. Configuration Configure Hibernate Envers in your project is very simple, just need to add   hibernate-envers   as project dependency. <dependency> <groupId>org.hibernate</groupId> <artifactId>hibernate-envers</artifactId> </dependency> Done. No need extra Event listeners configuration as the early version. Basic Usage Hibernate Envers provides a simple   @Audited   annotation, you can place it on an Entity class or property of an Entity. @Audited private String description; If   @Audited   annotation is placed on a property, this property can be tracked. @Entity @Audited public class Signup implements Serializa