https://github.com/hantsy/angular-es6-sample/wiki/form
In before steps, we have created dummy files by
Replace the content of new-post.controller.js with the following:
In
new-post.html:
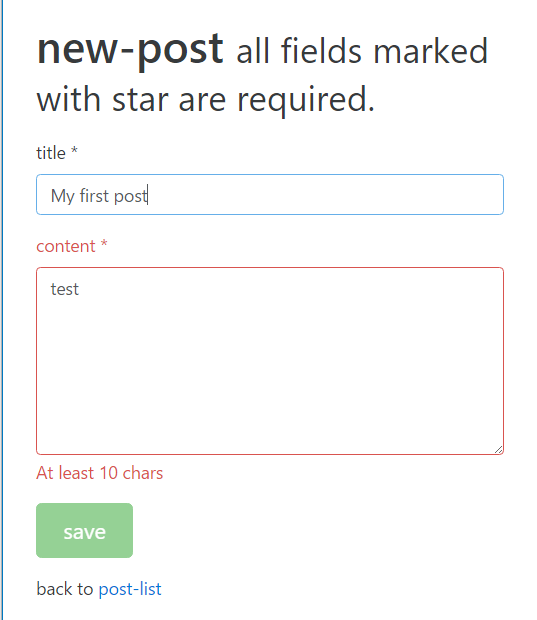
There are only two fields in this form, a title input field and a content textarea.
In the template file, the controller is alias as
It also includes form validation, title is a required field, and content is required and min-length of the content is set to 10. Here I used
Each field has some status to describes input field state change, it could be valid, invalid, touched, untouched, dirty, pristine.
For the form, there are also some status values available, such as valid, invalid, pending, submitted, dirty, pristine etc. It can be accessed by
And if the form validation failed, the error info can be gathered via expression:
With the help of ngMessages, we can decide how to show or hide the validation failure messages.
We can also change the field style to decorate the form group when errors occur. As the following screen, when the form is invalid, the error is shown on the field.
When the form is submitted successfully, it returns to posts list page. A new post is added there.

edit-post.controller.js:
When route to edit-post, it should accept a
In the
Add a
The content of edit-post template file is similar with new-post.
When post is saved successfully, it returns posts list.
post-details.controller.js:
Have a look at the
post-detail.html:
It is consist of three parts, post detail, comments list and a comment form to add new comment.
Handling form submission
We have created posts list page and fetched posts data from real remote APIs.In before steps, we have created dummy files by
gulp component for adding new posts and editing existing post. Let's enrich the content of them.Add post
Firstly add asavePost method in Post service. It can save a post or update a post. // Creates or updates an post
save(post) {
let request = {};
// If there's a id, perform an update via PUT w/ post's id
if (post.id) {
request.url = `${this._AppConstants.api}/posts/${post.id}`;
request.method = 'PUT';
// Delete the id from the post to ensure the server updates the id,
// which happens if the title of the post changed.
delete post.id;
// Otherwise, this is a new post POST request
} else {
request.url = `${this._AppConstants.api}/posts`;
request.method = 'POST';
}
// Set the post data in the data attribute of our request
request.data = post;
return this._$http(request);
}
class NewPostController {
  constructor(Post, $state) {
    'ngInject';

    this._Post = Post;
    this._$state = $state;
    this.data = { title: '', content: '' };
  }

  $onInit() {
    console.log("initializing NewPost...");
  }

  $onDestroy() {
    console.log("destroying NewPost...");
  }

  save() {
    console.log("saving data @" + this.data);
    this._Post.save(this.data)
      .then((res) => {
        this._$state.go('app.posts');
      })
  }

}

export default NewPostController;
constructor(), inject Post and $state, here $state is use for change state to route to other components.save() method calls savePost method of Post service, and when it done successfully, go to state app.posts aka posts component view.new-post.html:
<div class="page-header">
  <h1>{{'new-post'}} <small>all fields marked with star are required.</small></h1>
</div>
<div class="panel panel-default">
  <div class="panel-body">
    <form id="form" name="form" class="form" ng-submit="$ctrl.save()" novalidate>
      <div class="form-group" ng-class="{'has-error':form.title.$invalid && !form.title.$pristine}">
        <label class="form-control-label" for="title">{{'title'}} *</label>
        <input class="form-control" id="title" name="title" ng-model="$ctrl.data.title" required/>
        <div class="form-control-feedback" ng-messages="form.title.$error" ng-if="form.title.$invalid && !form.title.$pristine">
          <p ng-message="required">Post Title is required</p>
        </div>
      </div>
      <div class="form-group" ng-class="{'has-error':form.content.$invalid && !form.content.$pristine}">
        <label class="form-control-label" for="content">{{'content'}} *</label>

        <textarea class="form-control" type="content" name="content" id="content" ng-model="$ctrl.data.content" rows="8" required ng-minlength="10">

        </textarea>
        <div class="form-control-feedback" ng-messages="form.content.$error" ng-if="form.content.$invalid && !form.content.$pristine">
          <p ng-message="required">Post Content is required</p>
          <p ng-message="minlength">At least 10 chars</p>
        </div>

      </div>
      <div class="form-group">
        <button type="submit" class="btn btn-success btn-lg" ng-disabled="form.$invalid || form.$pending">  {{'save'}}
        </button>
      </div>
    </form>
  </div>
  <div class="panel-footer">
    back to <a href="#" ui-sref="app.posts">{{'post-list'}}</a>
  </div>
</div>
In the template file, the controller is alias as
$ctrl, and it uses a ng-submit directive to submit form by calling $ctrl.save() method.It also includes form validation, title is a required field, and content is required and min-length of the content is set to 10. Here I used
ng-minlength directive, the HTML 5 minlength attribute should also work.Each field has some status to describes input field state change, it could be valid, invalid, touched, untouched, dirty, pristine.
- The initial status should be
pristine, there is no interaction on the field, when input something it becomesdirty. -
touchedanduntouchedis designated for touchable device, such mobile, tablet, and touchable LCD etc. -
validandinvalidindicates validation results applied on related fields.
<form name>.<field name>.$<status>.For the form, there are also some status values available, such as valid, invalid, pending, submitted, dirty, pristine etc. It can be accessed by
<form name>.$<status>.And if the form validation failed, the error info can be gathered via expression:
<form name>.<field name>.$error.With the help of ngMessages, we can decide how to show or hide the validation failure messages.
We can also change the field style to decorate the form group when errors occur. As the following screen, when the form is invalid, the error is shown on the field.
When the form is submitted successfully, it returns to posts list page. A new post is added there.
Edit post
Edit post is very similar with the new post case. The difference is it should load the existing post in the initial stage which can be done in$onInit method of edit-post controller.edit-post.controller.js:
class EditPostController {
  constructor(Post, $state, $stateParams) {
    'ngInject';

    this._Post = Post;
    this._$state = $state;
    this.id = $stateParams.id;
    this.data = {};
  }

  $onInit() {
    console.log("initializing Edit Post...");
    this._Post.get(this.id).then((res) => this.data = res);
  }

  $onDestroy() {
    console.log("destroying Edit Post...");
  }

  save() {
    console.log("saving data @" + this.data);
    this._Post.save(this.data).then((res) => {
      this._$state.go('app.posts');
    });
  }

}

export default EditPostController;
id parameter. Inject $stateParams in constructor funcation, all path parameters can be accessed via this object.In the
$onInit method, it calls Post.get() to get a post by id.Add a
get method in Post service. get(id) {
let deferred = this._$q.defer();
if (!id.replace(" ", "")) {
deferred.reject("post id is empty");
return deferred.promise;
}
this._$http({
url: this._AppConstants.api + '/posts/' + id,
method: 'GET'
})
.then(
(res) => deferred.resolve(res.data),
(err) => deferred.reject(err)
);
return deferred.promise;
}
<div class="page-header">
<h1>{{'edit-post'}} <small>all fields marked with star are required.</small></h1>
</div>
<div class="panel panel-default">
<div class="panel-body">
<form id="form" name="form" class="form" ng-submit="$ctrl.save()" novalidate>
<div class="form-group">
<label class="form-control-label" for="title">{{'id'}}</label>
<div class="form-control-static" id="id" name="id">
{{$ctrl.data.id}}
</div>
</div>
<div class="form-group" ng-class="{'has-error':form.title.$invalid && !form.title.$pristine}">
<label class="form-control-label" for="title">{{'title'}} *</label>
<input class="form-control" id="title" name="title" ng-model="$ctrl.data.title" required/>
<div class="form-control-feedback" ng-messages="form.title.$error" ng-if="form.title.$invalid && !form.title.$pristine">
<p ng-message="required">Post Title is required</p>
</div>
</div>
<div class="form-group" ng-class="{'has-error':form.content.$invalid && !form.content.$pristine}">
<label class="form-control-label" for="content">{{'content'}} *</label>
<textarea class="form-control" type="content" name="content" id="content" ng-model="$ctrl.data.content" rows="8" required ng-minlength="10">
</textarea>
<div class="form-control-feedback" ng-messages="form.content.$error" ng-if="form.content.$invalid && !form.content.$pristine">
<p ng-message="required">Post Content is required</p>
<p ng-message="minlength">At least 10 chars</p>
</div>
</div>
<div class="form-group">
<button type="submit" class="btn btn-success btn-lg" ng-disabled="form.$invalid || form.$pending"> {{'save'}}
</button>
</div>
</form>
</div>
<div class="panel-footer">
back to <a href="#" ui-sref="app.posts">{{'post-list'}}</a>
</div>
</div>
Comment on POST
Another form is adding comment in the post details page. The post details page is too simple, just display the post details, comments and includes a form to add new comment for this post.post-details.controller.js:
class PostDetailController {
constructor(Post, $stateParams) {
'ngInject';
this._Post = Post;
this.id = $stateParams.id;
this.post = {};
this.comments = [];
this.newComment = {
content: ''
};
}
$onInit() {
console.log("initializing Post Details...");
this._Post.getWithComments(this.id)
.then(
(res) => {
this.post = res.post;
this.comments = res.comments
}
);
}
$onDestroy() {
console.log("destroying Post...");
}
onSaveComment() {
console.log("saving comment...@");
this._Post.saveComment(this.id, this.newComment)
.then((res) => {
//refresh comments by post.
console.log('saved comment.');
this._Post.getCommentsByPost(this.id)
.then(
(res) => {
this.comments = res;
this.newComment = {
content: ''
};
}
);
});
}
}
export default PostDetailController;
saveComment and getWithComments of Post service. saveComment(postId, comment) {
let request = {};
if (comment.id) {
request.url = `${this._AppConstants.api}/posts/${postId}/comments/${comment.id}`;
request.method = 'PUT';
delete comment.id;
} else {
request.url = `${this._AppConstants.api}/posts/${postId}/comments`;
request.method = 'POST';
}
request.data = comment;
return this._$http(request);
}
  get(id) {

    let deferred = this._$q.defer();

    if (!id.replace(" ", "")) {
      deferred.reject("post id is empty");
      return deferred.promise;
    }
    this._$http({
      url: this._AppConstants.api + '/posts/' + id,
      method: 'GET'
    })
      .then(
      (res) => deferred.resolve(res.data),
      (err) => deferred.reject(err)
      );
    return deferred.promise;
  }
getCommentsByPost(id) {
let deferred = this._$q.defer();
if (!id.replace(" ", "")) {
deferred.reject("post id is empty");
return deferred.promise;
}
this._$http({
url: this._AppConstants.api + '/posts/' + id + '/comments',
method: 'GET'
})
.then(
(res) => deferred.resolve(res.data),
(err) => deferred.reject(err)
);
return deferred.promise;
}
getWithComments(id) {
let deferred = this._$q.defer();
this._$q.all([
this.get(id),
this.getCommentsByPost(id)
])
.then(
(res) => {
deferred.resolve({ post: res[0], comments: res[1] })
}
);
return deferred.promise;
}
<div class="page-header">
  <h1 class="text-xs-center text-uppercase text-justify">
    {{$ctrl.post.title}}
  </h1>
  <p class="text-xs-center text-muted">{{$ctrl.post.createdAt|date:'short'}}</p>
</div>
<div class="card">
  <div class="card-block">
    <p>
      {{$ctrl.post.content}}
    </p>
  </div>
  <div class="card-footer">
    back to <a href="#" ui-sref="app.posts">{{'post-list'}}</a>
  </div>
</div>
<div class="card" ng-if="$ctrl.comments">
  <div class="card-block">
    <div class="media" ng-repeat="c in $ctrl.comments">
      <div class="media-left media-top">
        <a href="#">
          <img class="media-object" src="../" alt="...">
        </a>
      </div>
      <div class="media-body">
        <h6 class="media-heading">{{c.createdAt}}</h6>
        <p> {{c.content}}</p>
      </div>
    </div>
  </div>
</div>
<div class="card">
  <div class="card-block">
    <form id="form" name="form" class="form" ng-submit="$ctrl.onSaveComment()" novalidate>
      <div class="form-group" ng-class="{'has-danger':form.content.$invalid && !form.content.$pristine}">
        <!--<label class="form-control-label" for="content">{{'comment-content'}} *</label>-->
        <textarea class="form-control" type="content" name="content" id="content" ng-model="$ctrl.newComment.content" rows="8" required
          ng-minlength="10">
        </textarea>
        <div class="form-control-feedback" ng-messages="form.content.$error" ng-if="form.content.$invalid && !form.content.$pristine">
          <p ng-message="required">Comment is required</p>
          <p ng-message="minlength">At least 10 chars</p>
        </div>
      </div>
      <div class="form-group">
        <button type="submit" class="btn btn-success btn-lg" ng-disabled="form.$invalid || form.$pending">  {{'save'}}
        </button>
      </div>
    </form>
  </div>
</div>
评论